Ever wonder what various apps like Photos or Safari use when you click on the share button? So did I until a few days ago. It is apparently UIActivityViewController. I just learned a bit about how to use it, so I thought I would pass it along.
Update November 10, 2014: Want to see how to use UIActivityViewController in Swift? Check out the my newer post Add sharing to your Swift app via UIActivityViewController
Setting the Icon
While not a HUGE step, I thought I might mention it anyway. For my app, I wanted to use the standard Apple sharing button (which in iOS7 is a box with an arrow pointing up from the center). To get it from Interface Builder, you must use a UIBarButtonItem, so this button can only be in a UINavigationBar (part of UINavigationController) or UIToolbar. You simply add a UIBarButtonItem, and change its “Identifier” in the Attributes Inspector to “Action, as shown in the image.
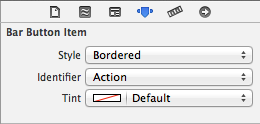
The Identifier is set to Action for the sharing icon.
Now the Code
This is actually surprisingly easy to do. So wire that up to an IBAction, here is the gist of how mine was set up.
- (IBAction)shareButton:(UIBarButtonItem *)sender
{
    NSString *textToShare = @"Look at this awesome website for aspiring iOS Developers!";
    NSURL *myWebsite = [NSURL URLWithString:@"http://www.codingexplorer.com/"];

    NSArray *objectsToShare = @[textToShare, myWebsite];

    UIActivityViewController *activityVC = [[UIActivityViewController alloc] initWithActivityItems:objectsToShare applicationActivities:nil];

    NSArray *excludeActivities = @[UIActivityTypeAirDrop,
                                   UIActivityTypePrint,
                                   UIActivityTypeAssignToContact,
                                   UIActivityTypeSaveToCameraRoll,
                                   UIActivityTypeAddToReadingList,
                                   UIActivityTypePostToFlickr,
                                   UIActivityTypePostToVimeo];

    activityVC.excludedActivityTypes = excludeActivities;

    [self presentViewController:activityVC animated:YES completion:nil];
}
That’s about it. You make an NSArray of objects to share, and basically pass that along to the UIActivityViewController when you instantiate it. For my app, I just wanted an NSString, and an NSURL to be shared, so I excluded things where that would make less sense like Printing, AirDropping, Vimeo, etc. You can read more about this at the Apple UIActivity Class Reference. Currently it supports these UIActivityTypes:
- UIActivityTypePostToFacebook
- UIActivityTypePostToTwitter
- UIActivityTypePostToWeibo
- UIActivityTypeMessage
- UIActivityTypeMail
- UIActivityTypePrint
- UIActivityTypeCopyToPasteboard
- UIActivityTypeAssignToContact
- UIActivityTypeSaveToCameraRoll
- UIActivityTypeAddToReadingList
- UIActivityTypePostToFlickr
- UIActivityTypePostToVimeo
- UIActivityTypePostToTencentWeibo
- UIActivityTypeAirDrop
So for my app, I left it able to post to Facebook, Twitter, Weibo, Tencent Weibo, Message, Mail, and copy to the Pasteboard.
Anyway, you then set that to the excludedActivityTypes property, and then tell your current view controller to present the UIActivityViewController. I was very surprised at how easy this was. So when you click on Facebook or Twitter in the UIActivityViewController (as long as you are set up to use Twitter or Facebook), it will show your text, and attach the URL in whatever way is appropriate for that social media choice. If you use Message or copy it to the pasteboard, you should get something similar to “Look at this awesome website for aspiring iOS Developers! http://www.codingexplorer.com/ “.
I will probably update this post as I learn more about UIActivityViewController. I hope you found this article helpful. If you did, don’t hesitate to share this post on twitter or your social media of choice. The blog is still pretty new, and every share helps. Of course, if you have any questions, don’t hesitate to contact me on twitter @CodingExplorer, and I’ll see what I can do. Thanks!
Sources:
This post was heavily influenced by a great tutorial for using AirDrop from the AppCoda Blog at http://www.appcoda.com/ios7-airdrop-programming-tutorial/ written by Simon Ng. Thank you for the great tutorial.