
If your Swift iOS app needs to import a picture from the user’s device, you’ve come to the right place today.
Let’s learn how to use UIImagePickerController to let the user select a photo from their device to load into your app.
Setting up the Storyboard
This is going to be a very simple storyboard. It’s going to be a button, and a UIImageView (to show our loaded image). So, start up a new “single view application” project, and let’s name it “ImagePickerTutorial”. Of course set your project’s language to Swift!
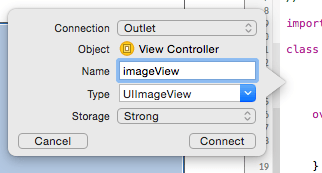
Alright, open up your assistant editor and add an outlet to our image UIImageView:
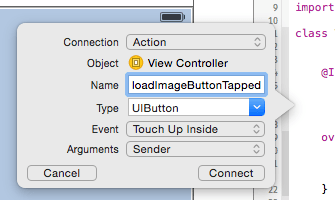
As well as an action to our button to load theUIImagePickerController:
Loading the UIImagePickerController
First, we’ll need an instance of UIImagePickerController. Put it at class scope, so we don’t have to allocate an entirely new one each time the button is tapped. We’ll also need to adopt a protocol to properly use UIImagePickerController, the aptly named UIImagePickerControllerDelegate, so make the top of your class look something like this:
class ViewController: UIViewController, UIImagePickerControllerDelegate, UINavigationControllerDelegate {

    @IBOutlet var imageView: UIImageView!

    let imagePicker = UIImagePickerController()
That’s the same IBOutlet we created earlier, but I’m used to having IBOutlets above most properties, so I put the imagePicker constant below it. The UINavigationControllerDelegate is required when setting this as the delegate for the UIImagePickerController.
We need to give it a few options before actually presenting it. First, we need to set our view controller as the delegate for the UIImagePickerController, to handle a few events. So, make your viewDidLoad look like this:
override func viewDidLoad() {
    super.viewDidLoad()

    imagePicker.delegate = self
}
You just need to add that last line, just denoting that “self” (the view controller this is written in) is the delegate for the imagePicker.
Next, head over to that loadImageButtonTapped action we made earlier, and we’ll call up the UIImagePickerController there:
@IBAction func loadImageButtonTapped(_ sender: UIButton) {
    imagePicker.allowsEditing = false
    imagePicker.sourceType = .PhotoLibrary

    presentViewController(imagePicker, animated: true, completion: nil)
}
We should set whether the imagePicker wants to allow editing, and we definitely need to set the sourceType property. The sourceType property wants a value of the enum named UIImagePickerController.SourceType, which gives 3 options:
- UIImagePickerController.SourceType.photoLibrary
- UIImagePickerController.SourceType.camera
- UIImagePickerController.SourceType.savedPhotosAlbum
What are the differences between photoLibrary and savedPhotosAlbum? Basically, photoLibrary gives the user access to any of their photos available on the device, with albums, overall view, and camera roll. The savedPhotosAlbum is pretty much just that, the images saved locally to your device, but no access to albums or any of the other views
The camera one is rather self explanatory. It lets you have the camera as the imageSource. We can cover this aspect later, for now, let’s just stick to the images saved locally to the user’s device.
Now, if you really want, you could run this app, and it will show the image picker as advertised. However, it of course won’t do anything with the image you selected, since we haven’t actually implemented code to do anything with its response yet.
Read the Image Picked from UIImagePickerController
Remember how we set this as the UIImagePickerController’s delegate? We probably should do that now, shouldn’t we? We need to implement the method “imagePickerController:didFinishPickingMediaWithInfo:” which is called exactly when it sounds like it should be, when the user picks something.
// MARK: - UIImagePickerControllerDelegate Methods

func imagePickerController(_ picker: UIImagePickerController, didFinishPickingMediaWithInfo info: [UIImagePickerController.InfoKey : Any]) {
    if let pickedImage = info[UIImagePickerController.InfoKey.originalImage] as? UIImage {
        imageView.contentMode = .scaleAspectFit
        imageView.image = pickedImage
    }

    dismiss(animated: true, completion: nil)
}
It will send the data back for us to use in that Swift Dictionary named “info”. We have to unpack it from there with a key asking for what media information we want. We just want the image, so that is what we ask for. For reference, the available options of UIImagePickerController.InfoKey are:
-
- mediaType
- originalImage
- editedImage
- cropRect
- mediaURL
- referenceURL
- mediaMetadata
- livePhoto
- phAsset
- imageURL
So, if we did allow editing, we could get to that image there. The “MediaType” one also lets you know if it is an Image or a Movie. If you’re curious about the rest of these, take a look at Apple’s Documentation.
So, we got out that part of the dictionary and optionally bound its type-casted form as a UIImage into the constant “pickedImage”.
The next line is not strictly-speaking necessary, but without it, the picture will come in and fill as much of the UIImageView as it can, and ignore its normal aspect ratio. This is actually a property on UIView, which UIImageView inherits from. The default is UIViewContentMode.ScaleToFill, hence it filling the area as much as it can. UIViewContentMode.ScaleAspectFit will tell it to fill as much of the screen as it can, while respecting the actual aspect ratio. Another option is UIViewContentMode.ScaleAspectFill, which also respects the Aspect Ratio, but it fills the entire view, which usually means zooming in such that the whole view is filled, and some of the image is outside of the view. This one is similar to a way to fit widescreen movies on a 4:3 TV called Pan and Scan.
The next line of course just sets the image of the UIImageView to be the image we just got pack. This is analogous to setting the text property of a UILabel to the Swift String that you want to show.
Finally, we dismiss the view controller that was presented modally, the UIImagePickerController. It will dismiss without this in iOS 8, it seems, but Apple encourages dismissing it yourself.
On that note, there is one other method from the UIImagePickerControllerDelegate protocol that we should implement, imagePickerControllerDidCancel. This one is called when the user taps the “Cancel” button. You are handed back a reference to the cancelled UIImagePickerController, and inside this method you should again dismiss the UIImagePickerController that you presented.
func imagePickerControllerDidCancel(_ picker: UIImagePickerController) {
    dismiss(animated: true, completion: nil)
}
Now, you can run your app, use the UIImagePickerController, and have it’s results show up in the UIImageView! There isn’t any zooming or panning yet, but this was mostly a tutorial for UIImagePickerController than the UIImageView itself. We’ll cover that another day.
For reference, the entire code for this app is:
import UIKit

class ViewController: UIViewController, UIImagePickerControllerDelegate, UINavigationControllerDelegate {

    @IBOutlet var imageView: UIImageView!

    let imagePicker = UIImagePickerController()

    @IBAction func loadImageButtonTapped(_ sender: UIButton) {
        imagePicker.allowsEditing = false
        imagePicker.sourceType = .photoLibrary

        present(imagePicker, animated: true, completion: nil)
    }

    override func viewDidLoad() {
        super.viewDidLoad()

        imagePicker.delegate = self
    }

    // MARK: - UIImagePickerControllerDelegate Methods

    func imagePickerController(_ picker: UIImagePickerController, didFinishPickingMediaWithInfo info: [UIImagePickerController.InfoKey : Any]) {
        if let pickedImage = info[UIImagePickerController.InfoKey.originalImage] as? UIImage {
            imageView.contentMode = .scaleAspectFit
            imageView.image = pickedImage
        }

        dismiss(animated: true, completion: nil)
    }

    func imagePickerControllerDidCancel(_ picker: UIImagePickerController) {
        dismiss(animated: true, completion: nil)
    }
}
Conclusion
Screenshots taken from Xcode 6.3.1, code checked against version listed at top of the post.
One thing to note, this post borrowed heavily from Steve Lipton’s post Swift Swift: Using the UIImagePickerController for a Camera and Photo Library. It’s a great post, and I hadn’t used UIImagePickerController much before this point, so it was very helpful. He covers significantly more topics like how to use the camera option, putting this whole thing in a Popover (which you’ll want to do if using this on an iPad), dealing with the situation of the device not having a camera (like the Simulator), and even some Auto Layout. Definitely check out his blog over at makeapppie.com for other great iOS tutorials in Swift.
The UIImagePickerController makes it easy for your users to select photos from their device, and keeps the user experience consistent with the other apps that also use it, including Apple’s own apps.
I hope you found this article helpful. If you did, please don’t hesitate to share this post on Twitter or your social media of choice, every share helps. Of course, if you have any questions, don’t hesitate to contact me on the Contact Page, or on Twitter @CodingExplorer, and I’ll see what I can do. Thanks!