I have been working on some watchOS updates lately, and thought it would be helpful to share a bit about that. First things first, we need to actually know how to make a watchOS app in the first place. It’s time to do “Hello World!” watchOS style!
Before we begin though, I want to help you the reader, learn what you need to know about programming for iOS, watchOS, tvOS, or OS X in Swift. As such, if you have any topics you would like to learn about on the Coding Explorer Blog, please suggest them to me on Twitter @CodingExplorer or the Contact Page.
Creating Your watchOS App
Open up Xcode, and create a new project, either from the splash screen, or the menu ( File → New → Project… ). Once there, go to the watchOS section and select Application, your screen should now look like this:

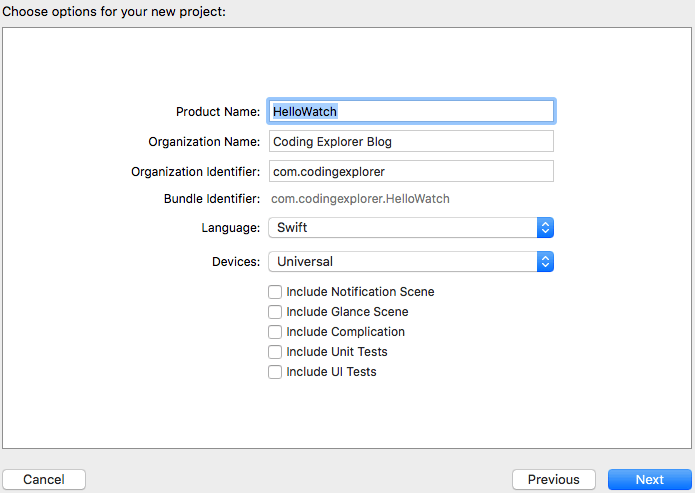
Since it is the only option, select “iOS App with WatchKit App” and click next. Once there, you name the app and make a few selections to set up this project. Let’s name the app “HelloWatch”. For this simple app, you can turn off all of the options at the bottom like the Notification Scene, Glance Scene, etc. Those are useful, but we just want a simple “Hello World” app for this project. Of course, make sure that your language is set to “Swift”.
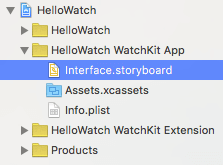
For this project, the iOS app will be left blank. If you are curious about doing a Hello World app for iOS itself, check out the post Hello World! Your first iOS App in Swift. Select a place to save your project, and now we can get started. Select the Interface.storyboard in “HelloWatch WatchKit App” group in the Navigator pane.
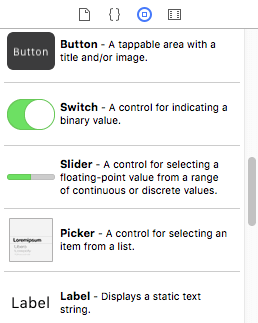
This is the screen for your watchOS app. Similar to the iOS “Hello World” app, we’ll make this app have a label and a button, and tapping the button will change the text of the label.
So drag out a label and a button from the Object Library onto your storyboard with the label above the button:
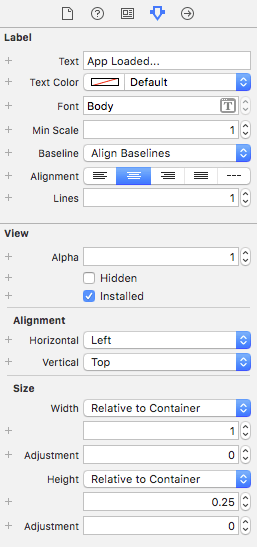
The label seems a bit cramped up there, so let’s make the label’s width the width of the screen by setting the Width to “Relative to Container” and giving it a value of 1. This value describes the amount of the screen by a decimal percentage, so 1 is 100%, 0.5 is 50%, etc. Let’s also give it a bit more room vertically, set the Height to be “Relative to Container” and give it a value of 0.25 (so 25%). Set the text itself to “App Loaded…”, and center its alignment, if you like.
Giving Some Swift Code to Your watchOS UI
That should be good for the UI. Now let’s wire this up to some code so we can make that button do something. The easiest way is to open up the Assistant Editor. It is the icon with the diagonal venn-diagram in the top right:

To get a little more room, you can now close the Utilities pane, the button on the far right that just has a box with a bar on the right side of it.
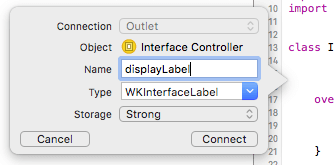
Once there, either Ctrl+Drag or Right-Click-Drag from the label to somewhere in the code (by convention, usually the top of your class). It will then ask you to name an outlet for this label. We’ll just call it “displayLabel”. Convention also suggests naming these (and pretty much all variables) in camel case, starting with a lowercase letter, and making the first letter of each word afterwards uppercase (so as to know when it is a new word, since we can’t use spaces in variable names).
Next, we will do similar for the button. Ctrl+Drag from the button to the code (anywhere inside the class brackets is fine, I am aware of no specific convention other than below the outlets) and create an action. Make sure that you select “action” as the type of connection. If you create an outlet, that will let you change things about the button, like its own text, but that’s not what we want here:
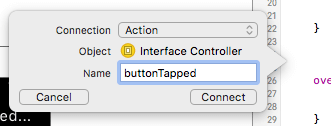
Again, make sure that it is an “Action”. This will create a method named “buttonTapped” in which we shall write our code. The code to change the WKInterfaceLabel’s text is pretty simple, it is just:
@IBAction func buttonTapped() {
    displayLabel.setText("Hello World!")
}
There is only 1 line in our method. We run the “setText” method on the WKInterfaceLabel, and give it the new text as an argument. In iOS, you can change the text in a UILabel by simply setting a property named “text”. Currently, WatchOS does not have such a property, and we can’t even read the text back out from the label programatically. I anticipate that will be added in a later version of watchOS, but for now, just use this method to set the text.
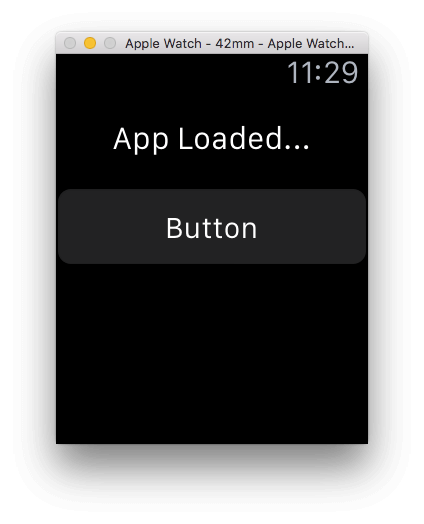
That’s pretty much it. If you have an Apple Watch, you can connect your phone to your Mac, and install the app that way, or you can use the simulator. In the top left, select the “HelloWatch WatchKit App” target, and whichever Phone and Watch Simulator bundle you wish (or your actual iPhone if you want to test this on real hardware). Then simply hit the play button. You might have to hit the “play” button a few times (especially if you don’t have SSDs in your computer, which make loading the simulators take much less time), but eventually you will be greeted with:
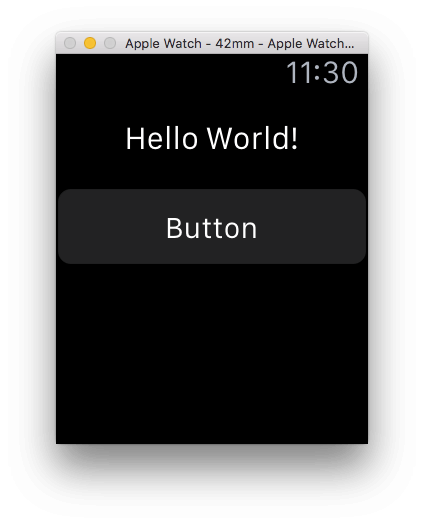
And when you tap the button you will see:
For completion’s sake, the entire code for the InterfaceController.swift file is:
import WatchKit
import Foundation

class InterfaceController: WKInterfaceController {

    @IBOutlet var displayLabel: WKInterfaceLabel!

    override func awake(withContext context: Any?) {
        super.awakeWithContext(context)

        // Configure interface objects here.
    }

    @IBAction func buttonTapped() {
        displayLabel.setText("Hello World!")
    }

    override func willActivate() {
        // This method is called when watch view controller is about to be visible to user
        super.willActivate()
    }

    override func didDeactivate() {
        // This method is called when watch view controller is no longer visible
        super.didDeactivate()
    }

}
With most of the code being provided by the template.
Conclusion
Screenshots taken from Xcode 7.1.1, code checked against version listed at top of the post.
That’s all there is to it for a simple “Hello World!” App in watchOS. This tutorial was intentionally left very plain. This tutorial will be a place to refer to later so as to not repeat some of the earlier setup steps for making a watchOS app. The later articles in this series will be more interesting, covering subjects like passing data between the iOS and watchOS app with WatchConnectivity, or how to make a complication. Stay tuned for more watchOS and Swift tutorials!
Check out the next article Watch Connectivity in Swift — Application Context, to learn a bit about how to share data between your iOS and watchOS app. It is even built upon the app from THIS article.
I hope you found this article helpful. If you did, please don’t hesitate to share this post on Twitter or your social media of choice, every share helps. Of course, if you have any questions, don’t hesitate to contact me on the Contact Page, or on Twitter @CodingExplorer, and I’ll see what I can do. Thanks!